解决wps的excel单元格填充图片操作过多导致偏移问题 收藏
收藏
评论
收藏解决wps的excel单元格填充图片操作过多导致偏移问题
明
2024-03-13 20:24·浏览量:3388
明
明恒
一、代码如下
import win32clipboard as w

import win32con

class Clipboard:

    @staticmethod

    def getText():

        w.OpenClipboard()

        d = w.GetClipboardData(win32con.CF_UNICODETEXT)

        w.CloseClipboard()

        return d


    @staticmethod

    def setText(aString):

        w.OpenClipboard()

        w.EmptyClipboard()

        w.SetClipboardData(win32con.CF_UNICODETEXT, aString)

        w.CloseClipboard()


def add_picture(excel_instance, row_num, column_name, image_path, img_width, img_height,height,width,offset):

    """

    Ecxcl 通过公式插入图片

    :param excel_instance: excel_instance, excel对象

    :param row_num: int, 行号

    :param column_name: str, 列名

    :paramimage_path: str, 图片的路径

    :param img_width: int 图片的宽度

    :param img_height: int 图片的高度

    :param height: int 行高

    :param width: int 列宽

    :param offset: str 向右偏移量,解决左边框遮住问题

    注: 没有实现自动适配行号, 列宽的功能

    """

    sht = excel_instance.workbook.ActiveSheet

    content = f'<table style="border-collapse: collapse;"><td style="padding: 5px;"><img src="{image_path}"width="{img_width}"height="{img_height}"></td></table>'
    sht.Range(f"{column_name}{row_num}").Activate()
    sht.Range(f"{column_name}{row_num}").Select()
    Clipboard.setText(content)

    res = sht.PasteSpecial(Format="Unicode 文本")
    range_selection = sht.Range(f"{column_name}{row_num}")

    # 设置行高

    range_selection.RowHeight = height

    # 设置列宽

    range_selection.ColumnWidth = width

    range_selection.Borders.LineStyle = 1

    # 获取当前单元格的图片对象

    cell = sht.Range(f"{column_name}{row_num}")

    # 定义偏移量

    offset = offset  # 偏移的像素值

    # 遍历每个图片对象并向右偏移

    for shape in sht.Shapes:

        if shape.Type == 13:  # 13 表示图片类型

            shape.Left += int(offset)
二、调用方式
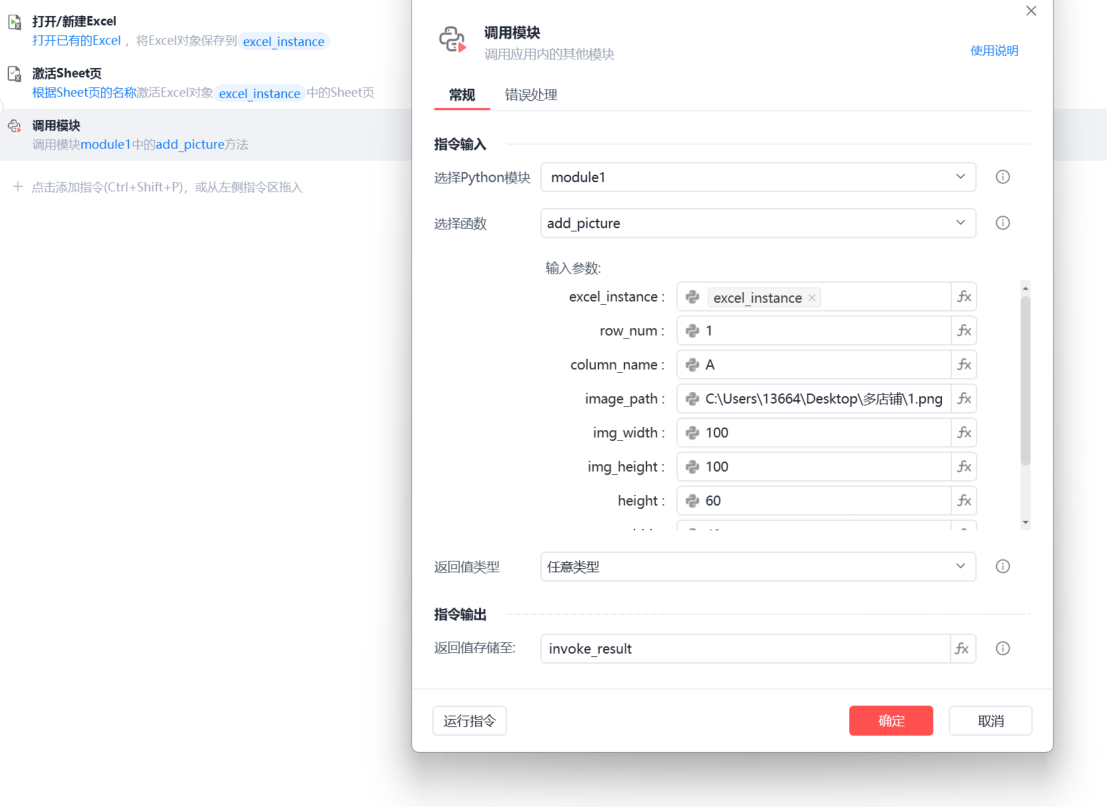
三、说明:
最好调用前先执行激活sheet页,否则可能会出现(-2147352567, '发生意外。', (0, None, None, None, 0, -2147467259), None)错误
遮住左边框可根据offset自行调整
最后感谢剑心大佬的代码协助!
收藏3全部评论(1)
最新
发布评论
评论


