wps中表格用嵌入方式插入的图片怎么导出? 收藏
收藏
评论
收藏wps中表格用嵌入方式插入的图片怎么导出?

2025-02-05 14:11·浏览量:2779
凡星
 影刀高级开发者
wps有一个好用的函数,那就是DISPIMG,这个函数的作用就是把图片嵌入到单元格中,让布局不在乱七八糟,更有条理,那么我们想要批量导出怎么实现呢
代码如下:
import zipfile
import os
import xml.etree.ElementTree as ET
import openpyxl
image_list = [] # 存放从excel读出的DISPIMG_id
def read_excel_data(filename_path):
# 加载 Excel 文件
workbook = openpyxl.load_workbook(filename_path, data_only=False)
sheet = workbook.active
# 遍历数据和公式
data = [] # data就是文本信息
for row in sheet.iter_rows(min_row=1, values_only=False):
row_data = []
for cell in row:
if cell.value and isinstance(cell.value, str) and '=_xlfn.DISPIMG(' in cell.value:
# 提取嵌入的图片 ID
formula = cell.value
start = formula.find('"') + 1
end = formula.find('"', start)
image_id = formula[start:end]
row_data.append(f"{image_id}")
image_list.append(image_id)
# print(image_id)
else:
# 其他数据直接添加
row_data.append(cell.value)
data.append(row_data)
return data
def get_xml_id_image_map(xlsx_file_path):
# 打开 XLSX 文件
with zipfile.ZipFile(xlsx_file_path, 'r') as zfile:
# 直接读取 XML 文件内容
with zfile.open('xl/cellimages.xml') as file:
xml_content = file.read()
with zfile.open('xl/_rels/cellimages.xml.rels') as file:
relxml_content = file.read()
# 将读取的内容转换为 XML 树
root = ET.fromstring(xml_content)
# 初始化映射字典
name_to_embed_map = {}
# 命名空间
namespaces = {
'xdr': 'http://schemas.openxmlformats.org/drawingml/2006/spreadsheetDrawing',
'a': 'http://schemas.openxmlformats.org/drawingml/2006/main'
}
# 遍历所有 pic 元素
for pic in root.findall('.//xdr:pic', namespaces=namespaces):
name = pic.find('.//xdr:cNvPr', namespaces=namespaces).attrib['name']
embed = pic.find('.//a:blip', namespaces=namespaces).attrib[
'{http://schemas.openxmlformats.org/officeDocument/2006/relationships}embed']
name_to_embed_map[name] = embed
# 打印结果
# print(name_to_embed_map)
root1 = ET.fromstring(relxml_content)
# 命名空间字典,根据 XML 中定义的命名空间进行设置
namespaces = {'r': 'http://schemas.openxmlformats.org/package/2006/relationships'}
# 创建 ID 和 Target 的映射
id_target_map = {child.attrib['Id']: child.attrib.get('Target', 'No Target Found') for child in
root1.findall('.//r:Relationship', namespaces=namespaces)}
# print(id_target_map)
# 使用字典推导构建新的映射表
name_to_target_map = {name: id_target_map[embed] for name, embed in name_to_embed_map.items() if
embed in id_target_map}
return name_to_target_map
def output_id_image(xlsx_file_path):
read_excel_data(xlsx_file_path)
name_to_target_map = get_xml_id_image_map(xlsx_file_path)
# 构建id_image_对
new_map = {key: name_to_target_map.get(key) for key in image_list if key in name_to_target_map}
print(new_map)
output_directory = 'images' #保存的图片目录
# 打开xlsx文件(即Zip文件)
with zipfile.ZipFile(xlsx_file_path, 'r') as zfile:
for key, image_path in new_map.items():
# 构建实际的图片路径
actual_image_path = f'xl/{image_path}' # 假设图片在'xl/media/'目录下
if actual_image_path in zfile.namelist():
# 读取图片内容
with zfile.open(actual_image_path) as image_file:
image_content = image_file.read()
# 保存图片到新的文件,使用key作为文件名
new_file_path = os.path.join(output_directory, f"{key}.png")
with open(new_file_path, 'wb') as new_file:
new_file.write(image_content)
else:
print(f"File {actual_image_path} not found in the archive.")
if __name__ == '__main__':
output_id_image("你的excel路径")
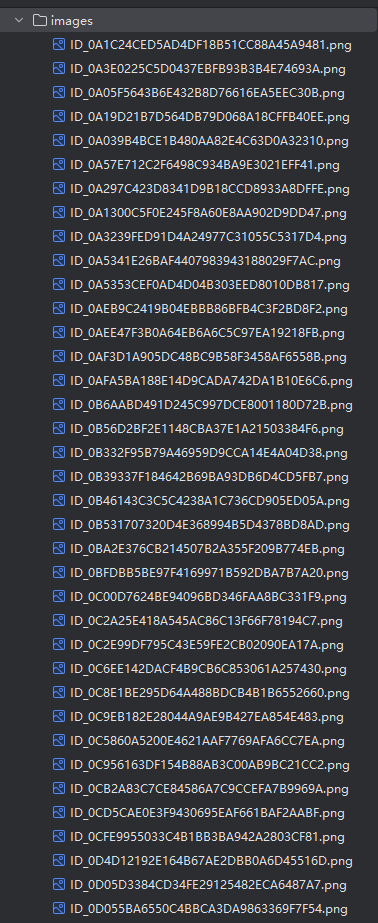
# 输出的图片名字就是 xlsx表中的列的DISPIMG_id,保存在images文件夹下
# 并会在控制台输出一个字典,key是DISPIMG_id,value是图片的路径,例如:{'ID_BE7EFF591B6C4978XXXXXX5266': 'media/image118.png'}
文章来源:
https://blog.csdn.net/QAZJOU/article/details/139709948
效果:
然后根据单元格公式值,自己映射一下即可,亲测有效
收藏7全部评论(1)
最新
发布评论
评论


