一个蛇皮验证码的破解思路 收藏
收藏
评论
收藏一个蛇皮验证码的破解思路

shendeju
2026-06-17 14:35·浏览量:790shendeju
发布于 2025-07-18 11:12更新于 2026-06-17 14:35790浏览1、群里看到一个验证码如下:
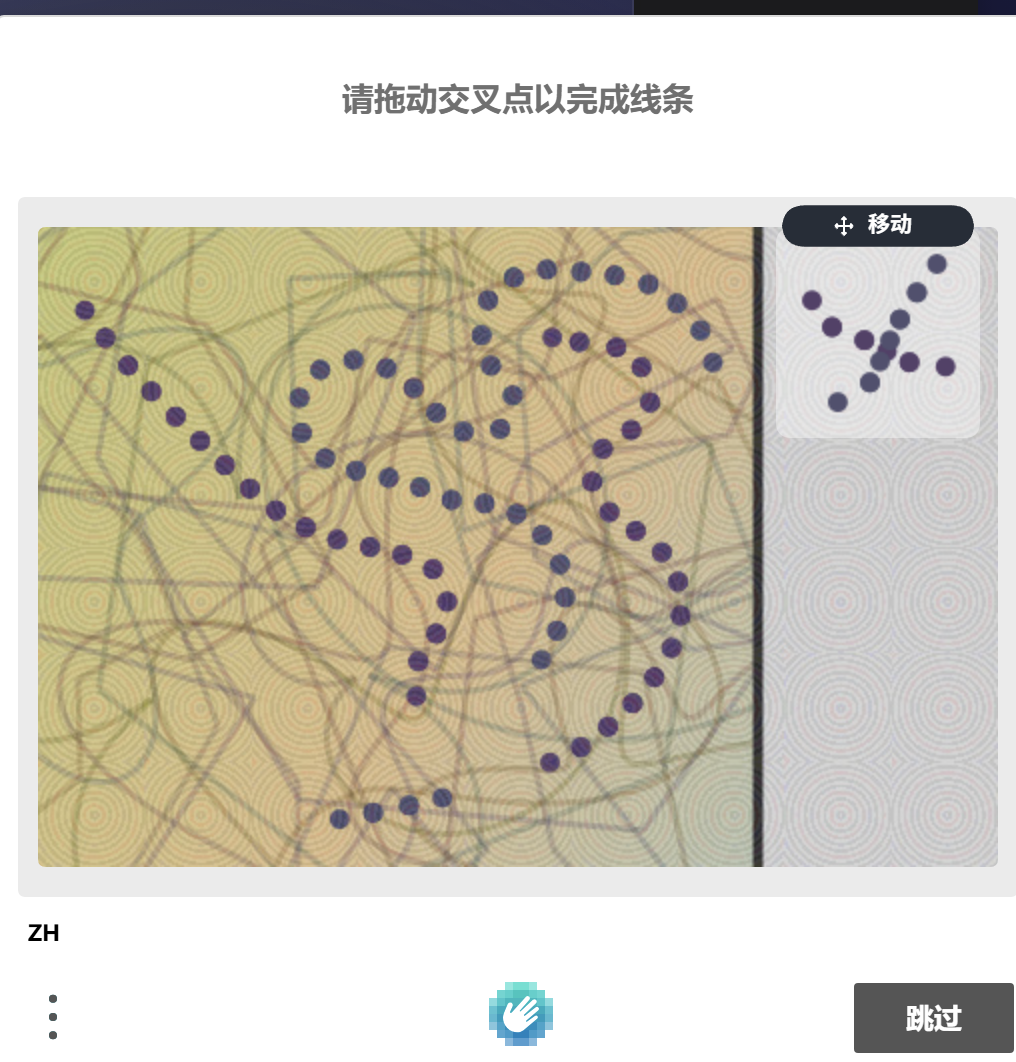
------------------------------------------
2、交给豆包的思路如下:
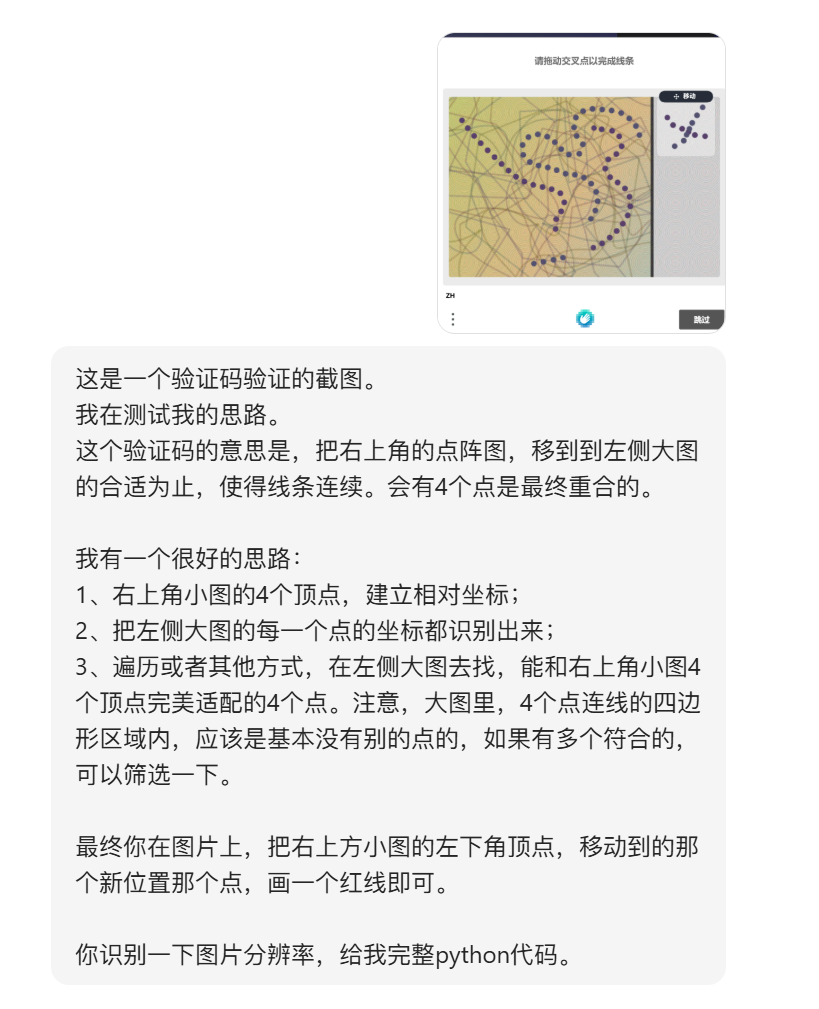
----------------------------------
3、大概耗时20多分钟,跟豆包反复battle之后,最终的效果:
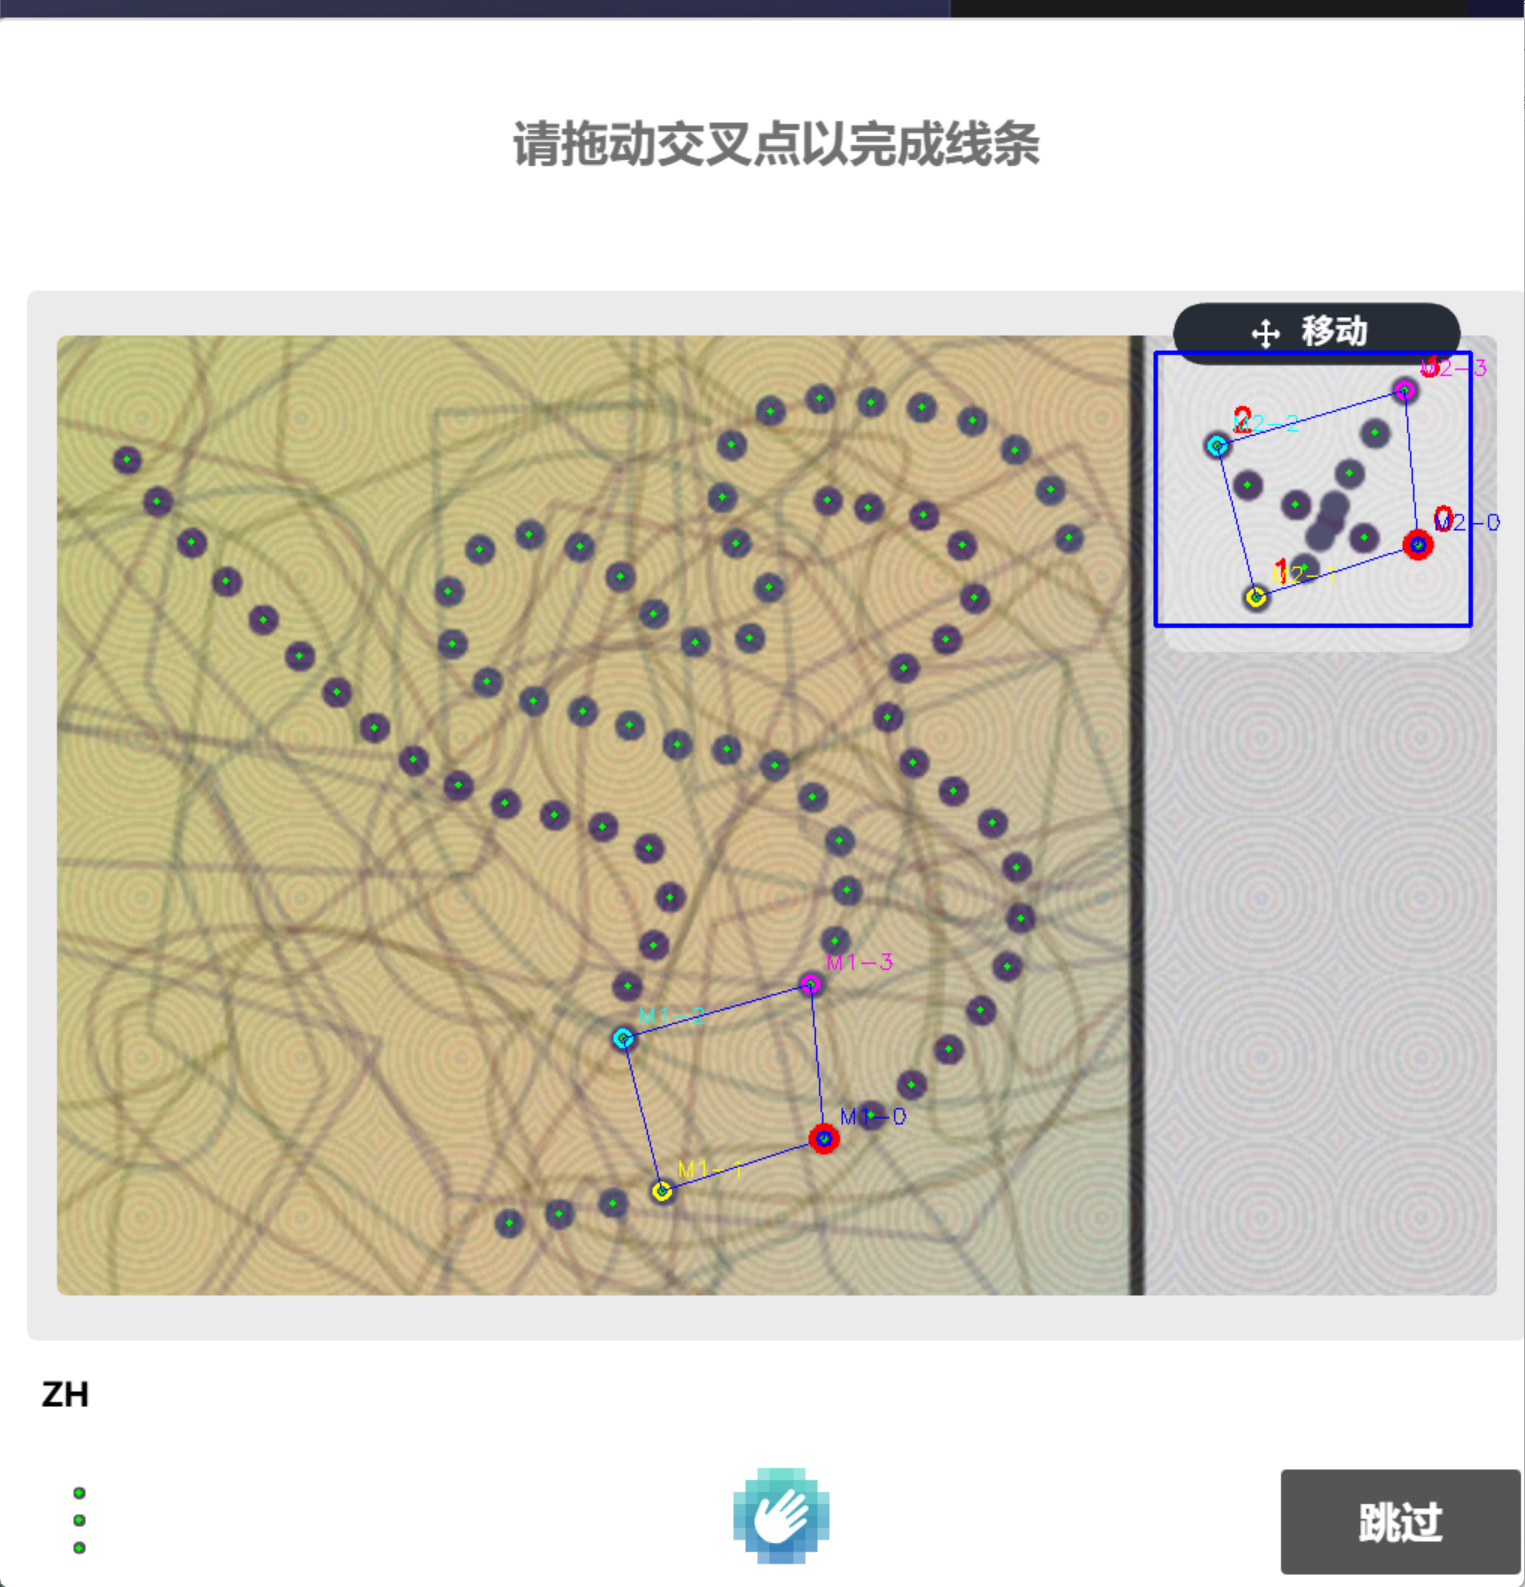
---------------------
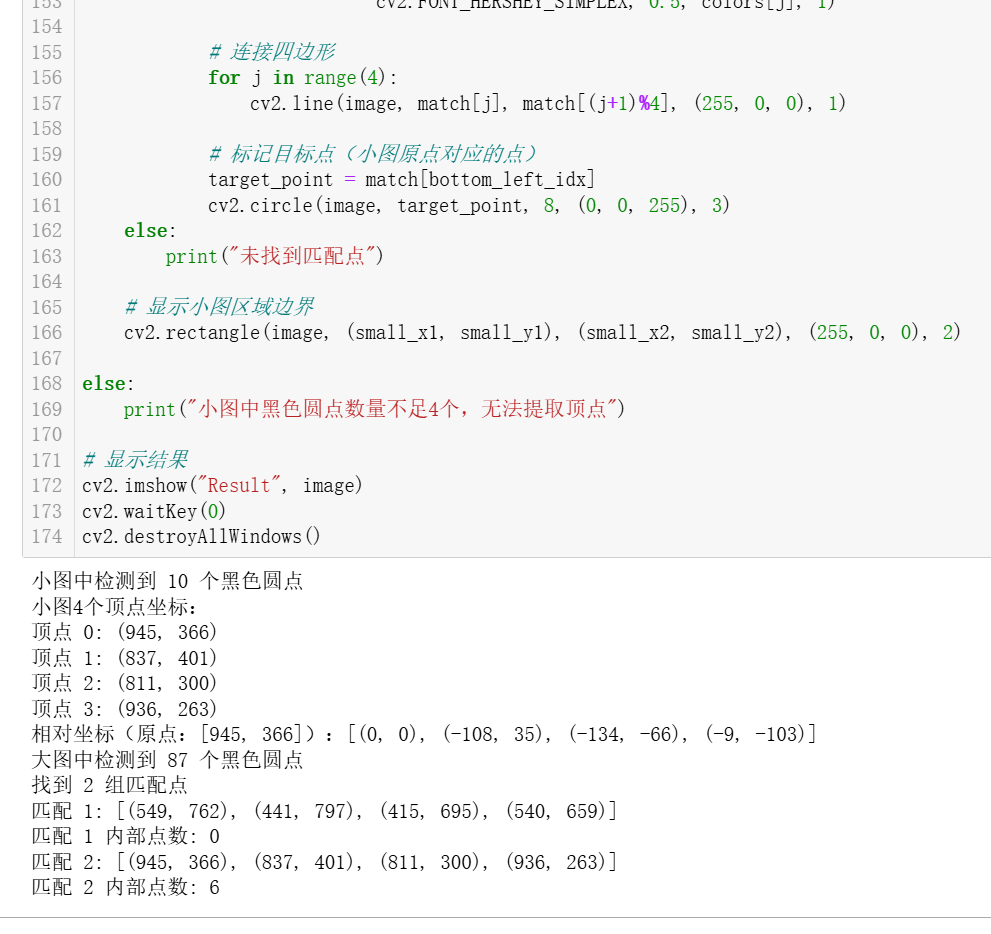
4、完整代码
import cv2
import numpy as np
from itertools import combinations

# 1. 读取图像并预处理
image = cv2.imread(r'C:\Users\shendeju\Desktop\11.png')
if image is None:
    raise FileNotFoundError("未找到图片文件,请检查路径")

# 转换为灰度图,二值化突出黑色圆点
gray = cv2.cvtColor(image, cv2.COLOR_BGR2GRAY)
_, thresh = cv2.threshold(gray, 100, 255, cv2.THRESH_BINARY_INV)  # 阈值可微调

# 形态学操作:去除干扰线条,保留圆点
kernel = cv2.getStructuringElement(cv2.MORPH_ELLIPSE, (3, 3))
thresh = cv2.morphologyEx(thresh, cv2.MORPH_OPEN, kernel, iterations=2)
thresh = cv2.morphologyEx(thresh, cv2.MORPH_CLOSE, kernel, iterations=2)

# 2. 检测右上角小图区域的黑色圆点
small_x1, small_y1, small_x2, small_y2 = 770, 238, 980, 420  # 根据实际调整
small_roi = thresh[small_y1:small_y2, small_x1:small_x2]

# 提取小图内黑色圆点轮廓
small_contours, _ = cv2.findContours(small_roi, cv2.RETR_EXTERNAL, cv2.CHAIN_APPROX_SIMPLE)

small_points = []
for cnt in small_contours:
    area = cv2.contourArea(cnt)
    if 10 < area < 500:  # 过滤噪点和过大区域
        M = cv2.moments(cnt)
        cx = int(M['m10'] / M['m00']) + small_x1
        cy = int(M['m01'] / M['m00']) + small_y1
        small_points.append((cx, cy))

print(f"小图中检测到 {len(small_points)} 个黑色圆点")

# 3. 提取小图的4个顶点
if len(small_points) >= 4:
    # 使用凸包获取外围点
    small_points_np = np.array(small_points, dtype=np.float32)
    hull = cv2.convexHull(small_points_np)
    hull_points = hull.reshape(-1, 2).astype(np.intp).tolist()

    # 筛选最佳4个顶点
    if len(hull_points) > 4:
        best_quad = None
        max_perimeter = 0
        for quad in combinations(hull_points, 4):
            perimeter = sum(np.linalg.norm(np.array(quad[i]) - np.array(quad[(i+1)%4])) for i in range(4))
            if perimeter > max_perimeter:
                max_perimeter = perimeter
                best_quad = quad
        small_vertices = best_quad
    else:
        small_vertices = hull_points

    # 标记小图4个顶点(红色)
    for i, (x, y) in enumerate(small_vertices):
        cv2.circle(image, (x, y), 5, (0, 0, 255), 2)
        cv2.putText(image, str(i), (x+10, y-10),
                    cv2.FONT_HERSHEY_SIMPLEX, 0.7, (0, 0, 255), 2)

    print("小图4个顶点坐标:")
    for i, (x, y) in enumerate(small_vertices):
        print(f"顶点 {i}: ({x}, {y})")

    # 4. 构建小图顶点相对坐标(以左下角为原点)
    # 确定真正的左下角顶点(x最大且y最大)
    bottom_left_idx = np.argmax([p[0] + p[1] for p in small_vertices])
    origin = small_vertices[bottom_left_idx]

    # 计算相对坐标
    relative_coords = []
    for (x, y) in small_vertices:
        rel_x = x - origin[0]
        rel_y = y - origin[1]
        relative_coords.append((rel_x, rel_y))

    print(f"相对坐标(原点:{origin}):{relative_coords}")

    # 5. 检测大图所有黑色圆点
    contours, _ = cv2.findContours(thresh, cv2.RETR_EXTERNAL, cv2.CHAIN_APPROX_SIMPLE)
    big_points = []
    for cnt in contours:
        area = cv2.contourArea(cnt)
        if 10 < area < 500:  # 过滤噪点和过大区域
            M = cv2.moments(cnt)
            cx = int(M['m10'] / M['m00'])
            cy = int(M['m01'] / M['m00'])
            big_points.append((cx, cy))
            cv2.circle(image, (cx, cy), 2, (0, 255, 0), -1)  # 标记所有检测到的点

    print(f"大图中检测到 {len(big_points)} 个黑色圆点")

    # 6. 在大图中寻找所有可能的匹配(允许误差)
    matches = []
    tolerance = 3  # 允许的像素误差

    # 构建快速查找结构
    point_set = set(big_points)

    for candidate_origin in big_points:
        match_points = [candidate_origin]
        match_count = 1

        for (rx, ry) in relative_coords[1:]:  # 跳过原点自身
            # 计算理论位置
            target_x = candidate_origin[0] + rx
            target_y = candidate_origin[1] + ry

            # 在误差范围内查找匹配点
            found = False
            for dx in range(-tolerance, tolerance+1):
                for dy in range(-tolerance, tolerance+1):
                    if (target_x + dx, target_y + dy) in point_set:
                        match_points.append((target_x + dx, target_y + dy))
                        match_count += 1
                        found = True
                        break
                if found:
                    break

            if not found:
                break

        # 如果找到4个匹配点,记录该匹配
        if match_count == 4:
            matches.append(match_points)

    # 7. 处理匹配结果
    if matches:
        print(f"找到 {len(matches)} 组匹配点")
        for i, match in enumerate(matches):
            print(f"匹配 {i+1}: {match}")

            # 计算匹配质量(内部点数量)
            pts = np.array(match, np.int32).reshape((-1, 1, 2))
            mask_quad = np.zeros_like(thresh)
            cv2.fillPoly(mask_quad, [pts], 255)

            inner_points = 0
            for pt in big_points:
                if mask_quad[pt[1], pt[0]] == 255 and pt not in match:
                    inner_points += 1

            print(f"匹配 {i+1} 内部点数: {inner_points}")

            # 标记匹配点(不同颜色区分)
            colors = [(255, 0, 0), (0, 255, 255), (255, 255, 0), (255, 0, 255)]
            for j, (x, y) in enumerate(match):
                cv2.circle(image, (x, y), 5, colors[j], 2)
                cv2.putText(image, f"M{i+1}-{j}", (x+10, y-10),
                            cv2.FONT_HERSHEY_SIMPLEX, 0.5, colors[j], 1)

            # 连接四边形
            for j in range(4):
                cv2.line(image, match[j], match[(j+1)%4], (255, 0, 0), 1)

            # 标记目标点(小图原点对应的点)
            target_point = match[bottom_left_idx]
            cv2.circle(image, target_point, 8, (0, 0, 255), 3)
    else:
        print("未找到匹配点")

    # 显示小图区域边界
    cv2.rectangle(image, (small_x1, small_y1), (small_x2, small_y2), (255, 0, 0), 2)

else:
    print("小图中黑色圆点数量不足4个,无法提取顶点")

# 显示结果
cv2.imshow("Result", image)
cv2.waitKey(0)
cv2.destroyAllWindows()
*下载这个图片测试的话,可能分辨率改了,需要调整一下右上角小图的定位。
感谢AI,以前有思路,也只能干坐着。现在只要有思路,就不缺代码。
作者红书/微信:shendeju
收藏6全部评论(1)
最新
发布评论
评论


