 收藏
收藏【验证码挑战】躲避障碍验证码详细步骤

 影刀高级开发者发布于 2026-03-23 17:50更新于 2026-03-25 10:21425浏览
【江湖召集令】躲避障碍验证码实战:基于YOLO的拖动避障自动路径规划的详细步骤以及缺少的代码补充,同样是https://dun.163.com/trial/avoid为目标
一,数据收集
打开https://dun.163.com/trial/avoid,先收集个20张到30张图片,如果后图片识别不出或者路径压到障碍物,可以增加收集的图片数量。
二,障碍物识别
自己瞅两眼发现就十种障碍物。
三,数据标注
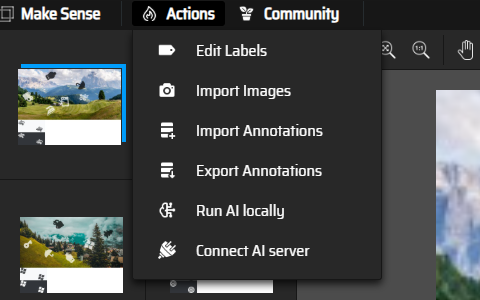
点击右下角的Get Started,传入图片,然后点击Object Detection。然后点击edit Labels,创建标签,
由于第二步确定了就十个障碍物,所以创建10个标签

接下来通过鼠标拖拽选定不同的障碍物,并在右侧确定对应的标签,做了多张发现每张图都是6个,所以做完可以回顾一下是否漏了

,每一张图片都标注完后点击export annotations导出,

选择第一个导出yolo

四、模型训练
打开PyCharm 之类的python编写工具,新建项目,并创建文件路径如下
dataset/                # 根目录
├── images/
│   ├── train/          # 训练集图片
│   └── val/            # 验证集图片
├── labels/
│   ├── train/          # 训练集标注文件(与图片同名,.txt)
│   └── val/            # 验证集标注文件
└── data.yaml           # 数据集配置文件
按照8:2的比例拆分图片和刚刚导出的yolo格式的txt,就比如有30张图片,随便挑选24张放到训练集图片里images/train下,6张放到验证集图片images/val下,标注文件放在labels的train和val下,且你图片的名字要和txt的一样,图片名称为1.jpg,标注文件就是1.txt。
然后data.yaml的内容如下
# 数据集路径(训练时可以使用绝对路径,也可以使用相对路径)
train: images/train      # 训练集图片相对路径
val: images/val          # 验证集图片相对路径

# 类别数量
nc: 10                    # 改成你实际标注的类别数

# 类别名称(顺序必须与标注时的顺序对应)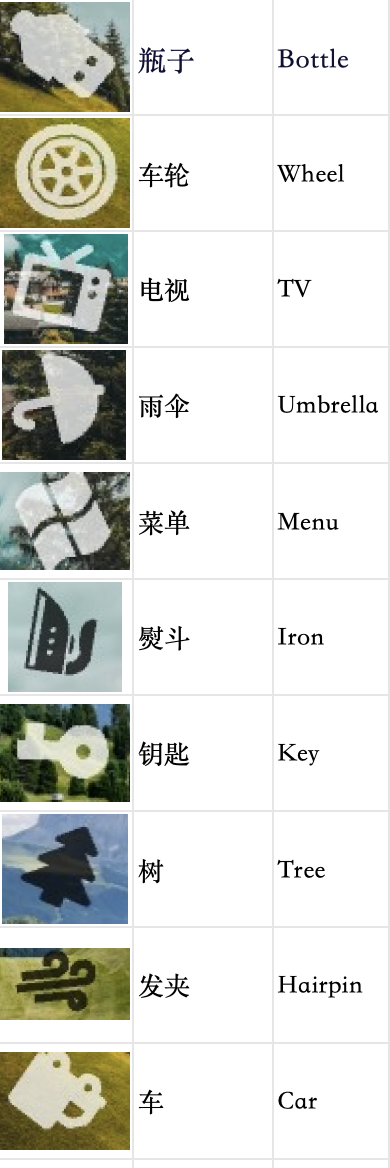
names: ["钥匙","车轮","雨伞","电视","菜单","熨斗","树","车","发夹","瓶子"]names里的顺序要喝你在https://www.makesense.ai/ 创建标签的顺序一样。
然后安装 Ultralytics

pip install ultralytics安装完后输入命令
yolo train data=data.yaml model=yolov8n.pt epochs=500 imgsz=320 device=0训练参数说明:
data: 数据集配置文件
model: 预训练基础模型(YOLOv8n.pt)(没有会自动下载)
epochs: 训练轮次(500轮)
imgsz: 图像尺寸(320px)
device:0表示第一块GPU,如果没有GPU就改成device=cpu,如果是配备 Apple Silicon(M 系列)芯片的 Mac(M1/M2/M3 等)电脑则是device=mps
训练结束后,最佳模型保存在 runs/detect/train/weights/best.pt。可以用它进行预测:

试着运行
from ultralytics import YOLO

model = YOLO('runs/detect/train/weights/best.pt')
print(model.names)

results = model('images/train/1.jpg',conf=0.3,iou=0.5)
print(results)
results[0].show()
成功识别
五、路径规划算法
通过修改width: 20px;改成width: 40px发现小球跟着变大,推断小球大小为20px,我们按住小球的时候要确保没碰到其他的,且是按住中心点的,所以要确保与其他目标有大于10px的距离,


通过ps发现图片以(0,160)分成上下两个区域,下方为目标选项,上方为操作区域。

代码整体思路
加载模型并预测:对输入图片运行YOLO,获取所有检测框(类别、置信度、坐标)。
筛选目标:从检测结果中找出位于下层(y > 160)的四个相同目标(例如某一特定类别),选择其中一个作为最终目标点。
障碍物处理:除目标自身外,其他所有检测框都视为障碍物,并向外膨胀10px,作为不可通行区域。
路径规划:使用a*在栅格地图(320×240)上规划从起点(10,150)到目标点的路径。
随机抖动:把路径规划的结果进行随机抖动,使得更像真人操作。
移动目标:把鼠标从(10,150)在路径里移动到最终目标点(非匀速移动)。
import io
import requests
import numpy as np
import random
from PIL import Image
from DrissionPage import ChromiumPage
from ultralytics import YOLO
import heapq  # A*用优先队列


# ------------------------- 1. 加载模型 -------------------------
def load_model(model_path):
    """
    加载训练好的YOLO模型
    :param model_path: 模型文件路径(如 'runs/detect/train/weights/best.pt')
    :return: YOLO模型对象
    """
    model = YOLO(model_path)
    return model


# ------------------------- 2. 推理并获取分层信息 -------------------------
def get_targets_from_image(img_path, model, img_width=320, img_height=240, split_y=160):
    """
    对图片进行推理,根据y=split_y分为上下两层:
        - 下层(y >= split_y):取第一个检测目标,返回其类别
        - 上层(y < split_y):返回所有目标框列表(格式 [x1, y1, x2, y2])
    同时找出上层中与下层类别相同的目标框(作为最终移动目标点)
    """
    results = model(img_path)
    boxes = results[0].boxes.xyxy.cpu().numpy()
    classes = results[0].boxes.cls.cpu().numpy().astype(int)

    print("所有检测到的目标:")
    for i, (box, cls) in enumerate(zip(boxes, classes)):
        x1, y1, x2, y2 = box
        print(f"目标 {i + 1}: 类别={cls}, 坐标=({x1:.1f}, {y1:.1f}, {x2:.1f}, {y2:.1f})")

    lower_boxes, lower_classes = [], []
    upper_boxes, upper_classes = [], []

    for box, cls in zip(boxes, classes):
        x1, y1, x2, y2 = box
        center_y = (y1 + y2) / 2
        if center_y >= split_y:
            lower_boxes.append(box)
            lower_classes.append(cls)
        else:
            upper_boxes.append(box)
            upper_classes.append(cls)

    if not lower_boxes:
        raise Exception("下层未检测到任何目标!")
    lower_category = lower_classes[0]

    target_box = None
    for box, cls in zip(upper_boxes, upper_classes):
        if cls == lower_category:
            target_box = box
            break

    print(f"上层所有目标类别: {upper_classes}")
    return lower_category, upper_boxes, target_box


# ------------------------- 3. 构建栅格地图(障碍物膨胀) -------------------------
def create_obstacle_map(width, height, obstacle_boxes, buffer=10, exclude_box=None):
    """
    创建二值栅格地图,0表示可通行,1表示障碍物
    """
    map_grid = np.zeros((height, width), dtype=np.uint8)

    for box in obstacle_boxes:
        if exclude_box is not None and np.array_equal(box, exclude_box):
            continue

        x1, y1, x2, y2 = box
        x1 = max(0, int(x1) - buffer)
        y1 = max(0, int(y1) - buffer)
        x2 = min(width, int(x2) + buffer)
        y2 = min(height, int(y2) + buffer)

        map_grid[y1:y2, x1:x2] = 1

    return map_grid


# ------------------------- ⭐ 4. A* 路径规划(核心新增) -------------------------
def astar(start, goal, obstacle_map):
    """
    A*路径搜索(保证一定能找到路径,只要存在)

    :param start: 起点 (x, y)
    :param goal: 终点 (x, y)
    :param obstacle_map: 障碍物地图
    :return: 路径 [(x,y), ...]
    """

    h, w = obstacle_map.shape

    # ✅ 8方向移动(比4方向更自然)
    directions = [
        (-1, 0), (1, 0), (0, -1), (0, 1),
        (-1, -1), (-1, 1), (1, -1), (1, 1)
    ]

    def heuristic(a, b):
        # ✅ 欧几里得距离(更平滑)
        return ((a[0] - b[0]) ** 2 + (a[1] - b[1]) ** 2) ** 0.5

    open_set = []
    heapq.heappush(open_set, (0, start))

    came_from = {}
    g_score = {start: 0}

    while open_set:
        _, current = heapq.heappop(open_set)

        if current == goal:
            # ✅ 回溯路径
            path = []
            while current in came_from:
                path.append(current)
                current = came_from[current]
            path.append(start)
            path.reverse()
            return path

        for dx, dy in directions:
            nx, ny = current[0] + dx, current[1] + dy

            if not (0 <= nx < w and 0 <= ny < h):
                continue

            if obstacle_map[ny, nx] == 1:
                continue

            tentative_g = g_score[current] + heuristic(current, (nx, ny))

            if (nx, ny) not in g_score or tentative_g < g_score[(nx, ny)]:
                g_score[(nx, ny)] = tentative_g
                f_score = tentative_g + heuristic((nx, ny), goal)

                heapq.heappush(open_set, (f_score, (nx, ny)))
                came_from[(nx, ny)] = current

    raise Exception("A*未找到路径(说明目标被完全包围)")


# ------------------------- ⭐ 5. 路径简化(减少点数量) -------------------------
def simplify_path(path, step=5):
    """
    路径抽稀(减少点数,让移动更自然)

    :param path: A*路径
    :param step: 每隔多少点取一个
    """
    return path[::step] + [path[-1]]


# ------------------------- 5. 路径抖动(随机扰动) -------------------------
def is_valid_point(x, y, obstacle_map):
    h, w = obstacle_map.shape
    if not (0 <= x < w and 0 <= y < h):
        return False
    return obstacle_map[y, x] == 0


def is_line_valid(p1, p2, obstacle_map):
    x1, y1 = p1
    x2, y2 = p2

    steps = max(abs(x2 - x1), abs(y2 - y1))

    for i in range(steps + 1):
        t = i / steps
        x = int(x1 + (x2 - x1) * t)
        y = int(y1 + (y2 - y1) * t)

        if obstacle_map[y, x] == 1:
            return False

    return True


def add_micro_jitter(path, obstacle_map, jitter_strength=1, jitter_prob=0.1):
    """
    在路径上加轻微扰动(已降低频率,更稳定)
    """
    new_path = []

    for i, (x, y) in enumerate(path):
        if i == 0 or i == len(path) - 1:
            new_path.append((x, y))
            continue

        if random.random() > jitter_prob:
            new_path.append((x, y))
            continue

        for _ in range(3):
            jx = x + random.randint(-jitter_strength, jitter_strength)
            jy = y + random.randint(-jitter_strength, jitter_strength)

            if (
                    is_valid_point(jx, jy, obstacle_map)
                    and is_line_valid(new_path[-1], (jx, jy), obstacle_map)
            ):
                new_path.append((jx, jy))
                break
        else:
            new_path.append((x, y))

    return new_path


# ------------------------- 6. 鼠标移动执行(相对移动) -------------------------
def ease_in_out(t):
    return 3 * t ** 2 - 2 * t ** 3


def move_mouse_bezier(page, path):
    """
    按路径移动鼠标(已适配A*路径)
    """
    if not path:
        return

    current = path[0]
    total = len(path)

    for i, target in enumerate(path[1:], start=1):
        dx = target[0] - current[0]
        dy = target[1] - current[1]

        t = i / total
        speed_factor = ease_in_out(t)

        duration = 0.01 + 0.05 * speed_factor

        page.actions.move(dx, dy, duration=duration)

        if random.random() < 0.05:
            page.wait(random.uniform(0.01, 0.03))

        current = target

    page.actions.release()


# ------------------------- 6. 主流程整合 -------------------------
def main():
    page = ChromiumPage()
    page.get('https://dun.163.com/trial/avoid')
    page.ele('.yidun_tips').click()
    page.wait(2)

    bg_img = page.ele('.yidun_bg-img')
    img_url = bg_img.attr('src')
    resource = requests.get(img_url)
    img = Image.open(io.BytesIO(resource.content))
    img_path = "current_bg.jpg"
    img.save(img_path)

    model = load_model('runs/detect/train/weights/best.pt')

    lower_category, upper_boxes, target_box = get_targets_from_image(
        img_path, model, img_width=320, img_height=240, split_y=160
    )

    if target_box is None:
        raise Exception("未找到目标")

    obstacle_map = create_obstacle_map(
        320, 240, upper_boxes, buffer=8, exclude_box=target_box
    )

    start = (10, 150)
    goal = (
        int((target_box[0] + target_box[2]) / 2),
        int((target_box[1] + target_box[3]) / 2)
    )

    # ⭐ A*路径(核心)
    path = astar(start, goal, obstacle_map)

    # ⭐ 路径简化(否则点太密)
    path = simplify_path(path, step=4)

    # ⭐ 微扰动(更像人)
    path = add_micro_jitter(path, obstacle_map)

    page.actions.hold('.yidun_avoid-front')
    move_mouse_bezier(page, path)

    print("拖动完成!")


if __name__ == "__main__":
    main()


