【验证码挑战】tiktok shope 的点击选中两个相同形状的物体 收藏
收藏
评论
收藏【验证码挑战】tiktok shope 的点击选中两个相同形状的物体
汤
汤姆布利柏
2026-03-27 16:50·浏览量:456汤
汤姆布利柏
 影刀高级开发者发布于 2026-03-26 15:02更新于 2026-03-27 16:50456浏览
我这个应该就在tk的这个背景图和物体简单的好识别点。
效果如下
RPA为
py代码为
# 使用提醒:
# 1. xbot包提供软件自动化、数据表格、Excel、日志、AI等功能
# 2. package包提供访问当前应用数据的功能,如获取元素、访问全局变量、获取资源文件等功能
# 3. 当此模块作为流程独立运行时执行main函数
# 4. 可视化流程中可以通过"调用模块"的指令使用此模块

import xbot
from xbot import print, sleep
from .import package
from .package import variables as glv
import cv2
import numpy as np
import requests
from skimage.metrics import structural_similarity as ssim

def main(args):
    pass

def get_coord(url):
    img = load_image_from_url(url)

    edges = preprocess(img)

    objects = find_objects(img, edges)

    print("检测到物体数量:", len(objects))

    patches = extract_patches(img, objects)

    i, j = find_most_similar(patches, objects)

    if i is None:
        print("未找到匹配")
        return

    # 获取两个物体中心点坐标
    def get_center(obj):
        x, y, w, h = obj
        return (x + w // 2, y + h // 2)

    p1 = get_center(objects[i])
    p2 = get_center(objects[j])
    p1_scaled = scale_point(p1, (552, 344), (348, 216.86))
    p2_scaled = scale_point(p2, (552, 344), (348, 216.86))
    print("匹配坐标:")
    print("物体1:", p1_scaled)
    print("物体2:", p2_scaled)
    return [p1_scaled,p2_scaled]

# -------------------------
# 1. 下载图片
# -------------------------
def load_image_from_url(url):
    """
    从URL下载图片并转为OpenCV格式
    """
    resp = requests.get(url)
    img_arr = np.frombuffer(resp.content, np.uint8)
    img = cv2.imdecode(img_arr, cv2.IMREAD_COLOR)
    return img


# -------------------------
# 2. 图像预处理
# -------------------------
def preprocess(img):
    """
    预处理:灰度 + 去噪 + 边缘检测
    """
    gray = cv2.cvtColor(img, cv2.COLOR_BGR2GRAY)

    # 去噪
    blur = cv2.GaussianBlur(gray, (5, 5), 0)

    # 边缘检测(关键)
    edges = cv2.Canny(blur, 50, 150)

    return edges


# -------------------------
# 3. 找轮廓(候选物体)
# -------------------------
def find_objects(img, edges):
    """
    从边缘图中找到轮廓,并筛选出可能的物体
    增加颜色过滤 + 简单轮廓合并
    """
    contours, _ = cv2.findContours(edges, cv2.RETR_EXTERNAL, cv2.CHAIN_APPROX_SIMPLE)

    objects = []

    for cnt in contours:
        x, y, w, h = cv2.boundingRect(cnt)

        # 尺寸和面积筛选
        if 30 < w < 150 and 30 < h < 150:
            area = w * h
            if area < 1000:
                continue  # 去掉噪点

            # -------------------------
            # 颜色过滤:排除接近背景色的区域
            # 背景 RGB 都在 215-250 之间
            # -------------------------
            patch = img[y:y+h, x:x+w]
            mean_color = cv2.mean(patch)[:3]  # BGR
            if all(215 <= c <= 250 for c in mean_color):
                continue  # 忽略接近背景色的轮廓

            objects.append((x, y, w, h))

    # -------------------------
    # 简单轮廓合并(防止一个物体被分成两个)
    # 如果两个轮廓靠得很近,且颜色相似,合并为一个
    # -------------------------
    merged = []
    used = [False] * len(objects)

    for i in range(len(objects)):
        if used[i]:
            continue
        x1, y1, w1, h1 = objects[i]
        cx1, cy1 = x1 + w1 // 2, y1 + h1 // 2
        merge_rect = [x1, y1, x1 + w1, y1 + h1]

        for j in range(i + 1, len(objects)):
            if used[j]:
                continue
            x2, y2, w2, h2 = objects[j]
            cx2, cy2 = x2 + w2 // 2, y2 + h2 // 2

            # 距离判断(中心点距离 < 50)
            if abs(cx1 - cx2) < 50 and abs(cy1 - cy2) < 50:
                # 颜色判断
                patch1 = img[y1:y1+h1, x1:x1+w1]
                patch2 = img[y2:y2+h2, x2:x2+w2]
                mean1 = np.array(cv2.mean(patch1)[:3])
                mean2 = np.array(cv2.mean(patch2)[:3])
                if np.linalg.norm(mean1 - mean2) < 30:  # 颜色差异小
                    # 合并矩形
                    merge_rect[0] = min(merge_rect[0], x2)
                    merge_rect[1] = min(merge_rect[1], y2)
                    merge_rect[2] = max(merge_rect[2], x2 + w2)
                    merge_rect[3] = max(merge_rect[3], y2 + h2)
                    used[j] = True

        merged.append((merge_rect[0], merge_rect[1],
                       merge_rect[2] - merge_rect[0],
                       merge_rect[3] - merge_rect[1]))

    return merged


# -------------------------
# 4. 裁剪 + 统一尺寸
# -------------------------
def extract_patches(img, objects):
    """
    把每个轮廓裁剪出来并统一大小
    """
    patches = []

    for (x, y, w, h) in objects:
        crop = img[y:y+h, x:x+w]

        # 转灰度(用于SSIM)
        crop_gray = cv2.cvtColor(crop, cv2.COLOR_BGR2GRAY)

        # 统一尺寸
        crop_resized = cv2.resize(crop_gray, (64, 64))

        patches.append(crop_resized)

    return patches


# -------------------------
# 5. 相似度匹配(找两个一样的)
# -------------------------
def find_most_similar(patches, objects):
    """
    使用SSIM找到最相似的两个物体
    """
    max_sim = -1
    best_pair = (None, None)

    n = len(patches)

    for i in range(n):
        for j in range(i + 1, n):
            sim = ssim(patches[i], patches[j])

            if sim > max_sim:
                max_sim = sim
                best_pair = (i, j)

    print("最高相似度:", max_sim)

    return best_pair

# -------------------------
# 6.坐标缩放
# -------------------------
def scale_point(point, src_size, dst_size):
    """
    坐标缩放函数
    :param point: (x, y)
    :param src_size: 原图尺寸 (w, h)
    :param dst_size: 显示尺寸 (w, h)
    """
    x, y = point
    src_w, src_h = src_size
    dst_w, dst_h = dst_size

    scale_x = dst_w / src_w
    scale_y = dst_h / src_h

    new_x = int(x * scale_x)
    new_y = int(y * scale_y)

    return (new_x, new_y)
要安装包为,注意:要影刀64位的版本,且电脑安装了Visual C++ Redistributable

获取的图片实际大小是552, 344,网页上渲染的大小是348, 216.86,所以获取坐标后要进行缩放,至于网页中的图片坐标怎么办,首先使用“鼠标悬停在元素上”,高级里放在左上角也就是图片的0,0位置,
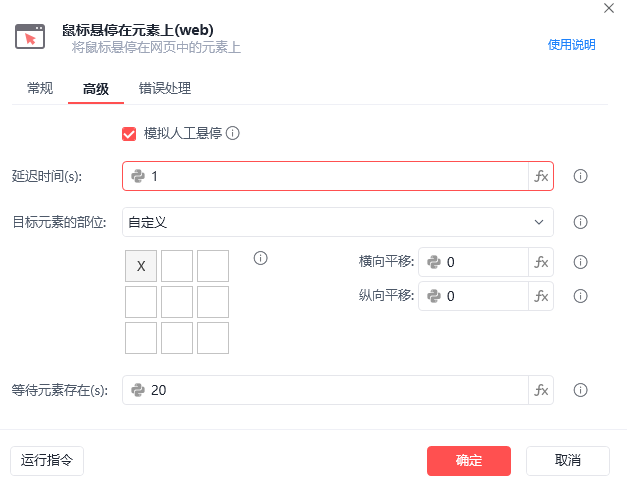
然后就能根据图片的坐标来在网页中点击

最后。。这tiktokshop的验证码有时候在发邮箱验证码前出现,有时候在之后出现,有时候都出现的,并且可能有的图片出错,所以我建议是主流程中并发调用

然后rpa改成
收藏8全部评论(1)
最新
发布评论
评论


